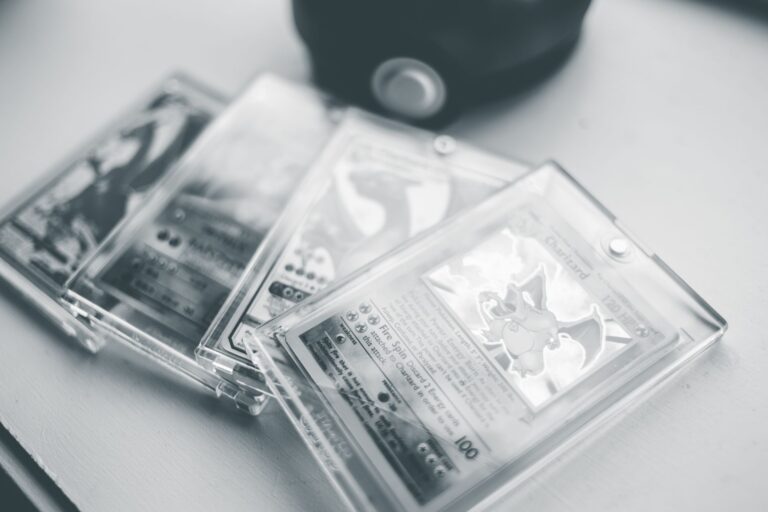
Grading Pokémon cards at home before submitting them to a professional service comes down to carefully inspecting four key areas: centering, corners, edges, and surface condition. You need a clean workspace, good lighting, a jeweler’s loupe or magnifying glass, and a centering tool or ruler. By systematically evaluating each of these categories on a 1-to-10 scale — the same framework that PSA, BGS, and CGC use — you can estimate a card’s grade with reasonable accuracy and avoid wasting money sending in cards that will come back as 5s or 6s.
For example, a Base Set Charizard that you think is near-mint might actually have a print line running across the holo that drops it to a PSA 7 or lower, and catching that before you pay $50 or more for grading saves real money. This article walks through the full self-grading process step by step, from the tools you need to the specific defects to look for in each grading category. We will cover centering measurement techniques, how to spot surface imperfections that are invisible to the naked eye, the differences between what PSA, BGS, and CGC prioritize, and when it makes sense to submit versus when you should just sell a card raw. Whether you are sorting through a childhood collection or evaluating a recent pull from a modern set, pre-grading at home is the single best way to maximize your return on grading fees.
Table of Contents
- What Tools Do You Need to Grade Pokémon Cards at Home?
- How to Evaluate Centering Like the Grading Companies Do
- Inspecting Corners and Edges Under Magnification
- Surface Inspection Techniques That Catch Hidden Defects
- Common Mistakes That Lead to Disappointing Grades
- Deciding Which Grading Service to Submit To
- Building a Pre-Grading Routine That Saves Money Long-Term
- Conclusion
- Frequently Asked Questions
What Tools Do You Need to Grade Pokémon Cards at Home?
The bare minimum is a jeweler’s loupe (10x magnification is standard), a soft microfiber cloth, a bright LED desk lamp, and a dark, clean surface to work on. A loupe in the 10x to 30x range costs between $8 and $20 and is non-negotiable — surface scratches, print lines, and tiny edge nicks that are invisible to the naked eye show up immediately under magnification. A penlight or small flashlight is also useful for angling light across the surface of holographic cards to reveal scratches and indentations. Some collectors use a jeweler’s scale to weigh cards and check for fakes, but that is a separate concern from grading condition. For centering, you can use a ruler and do the math yourself, or you can buy a dedicated centering tool like the ones sold by various Pokémon accessory brands. The manual method involves measuring the border width on each side and calculating the ratio.
For instance, if the left border is 2mm and the right border is 3mm, the centering is 40/60 — which psa considers acceptable for a 10, since they allow up to 55/45 on the front and 75/25 on the back. BGS is stricter on centering for a 10, requiring 50/50 to 55/45 front and back. Knowing these thresholds before you start saves you from guessing. A card stand or holder that keeps the card upright without you touching it is also worth having. Every time you handle a raw card, you risk adding fingerprints or micro-scratches. Wear cotton or nitrile gloves if you plan to inspect multiple cards, and never touch the surface directly. Some collectors skip gloves and then wonder why their cards come back with surface deductions — oils from your skin are a real problem, especially on modern cards with glossy finishes.
How to Evaluate Centering Like the Grading Companies Do
Centering is the easiest category to measure objectively, which is why it is the best place to start. Hold the card face-up and compare the border on the left to the right, then the top to the bottom. For modern Pokémon cards with uniform borders, this is straightforward. For vintage cards, especially those from the Base Set through Neo series, factory centering was often poor, and many cards straight out of the pack were 60/40 or worse. A card with 65/35 centering on the front is capped at a PSA 8 maximum, regardless of how perfect the surface and corners are. However, if you are grading with BGS (Beckett), centering is reported as a separate subgrade, so a card with slightly off centering can still receive high marks in the other three categories and end up with a respectable overall grade.
This is a meaningful distinction. A card that would top out at a PSA 8 due to centering alone might receive a BGS 9 with an 8.5 centering subgrade, because the final BGS grade is a weighted result of all four subgrades. For cards where centering is the only flaw, BGS can sometimes be the more favorable service. One limitation worth noting: centering on cards with full-art or borderless designs — which have become common in Sword and Shield and Scarlet and Violet era sets — is much harder to judge at home. These cards have no visible border to measure against, and the grading companies use the back of the card as the primary centering reference. Always flip the card over and check the back centering carefully on these designs, because a perfectly front-centered full-art can have badly off-center backing.
Inspecting Corners and Edges Under Magnification
Corners are where most cards lose points, and they are where you should spend the most time with your loupe. A true gem mint corner is perfectly sharp with no visible wear, no whitening, and no fraying of the card stock. Under 10x magnification, even minor handling can show as a faint white dot or a slightly rounded corner tip. Compare all four corners — grading companies will score based on the worst corner, not the average. A card with three perfect corners and one slightly dinged corner is not a 10. Edge wear is closely related but distinct. Run your loupe along all four edges looking for whitening, nicks, or small dents.
Whitening shows up as tiny white spots or lines along the edge where the blue backing layer is exposed. This is extremely common on cards that were stored loosely in tins or boxes without sleeves. Vintage cards from the late 1990s frequently have edge whitening simply from being shuffled during play. A card with visible edge whitening along even one side is unlikely to grade above an 8 at any major grading company. One specific thing to watch for on Japanese pokémon cards: the card stock is thinner and the edges tend to show wear differently. Instead of whitening, Japanese cards often develop small edge splits or layering where the card stock begins to separate. This is a more severe defect than simple whitening and can drop a card by two or more grade points. If you are considering submitting Japanese promos or high-value Japanese cards, examine the edges very carefully under magnification from multiple angles.

Surface Inspection Techniques That Catch Hidden Defects
Surface is the trickiest category to evaluate at home because many defects are only visible under specific lighting conditions. Hold the card under your LED lamp and slowly tilt it at various angles. Holographic cards are particularly revealing under angled light — scratches that are completely invisible when viewed straight-on will appear as fine lines when light hits the holo at a low angle. Do this in a dim room for the best contrast. Print lines, which are factory defects that appear as faint raised or depressed lines across the card surface, also show up best under angled light. The tradeoff here is between being too strict and too lenient. Inexperienced self-graders tend to fall into one of two camps: either they assume every card is a 10 because it “looks perfect” to the naked eye, or they find so many micro-imperfections under magnification that they talk themselves out of submitting anything.
The practical benchmark is this — if you cannot see a defect without magnification, it probably will not drop the card below a 9. If you can see a defect with your naked eye from arm’s length, the card is almost certainly an 8 or lower. The gray zone in between is where experience matters, and sending a few borderline cards through grading to calibrate your eye is worth the cost of learning. Surface also includes factory defects like ink spots, crimping, and texture inconsistencies. These are not your fault, but they still count against the grade. A card with a small ink dot on the back might otherwise be perfect, but that dot alone can cost it a full point. The frustrating reality is that some factory defects are invisible until you put the card under magnification, which is exactly why pre-screening at home matters.
Common Mistakes That Lead to Disappointing Grades
The most frequent mistake is ignoring the back of the card. Collectors tend to fixate on the front because that is the display side and the side they care about visually. But grading companies inspect the back with equal scrutiny. Back surface scratches from sliding across tables, edge whitening from handling, and centering issues are all common on card backs and are all graded. Many cards that look like easy 9s from the front come back as 7s because the back was rough. Another common error is submitting cards from packs that had poor quality control. Certain print runs are notorious for issues.
For example, many cards from the Vivid Voltage and Evolving Skies print runs had widespread surface texture inconsistencies and print lines. Submitting a card from one of these sets and expecting a 10 is optimistic at best. Before submitting bulk cards from any set, research known quality control issues for that print run. Collector forums and social media groups are full of data on which sets grade well and which ones are plagued by factory problems. Finally, do not assume that a card pulled fresh from a pack is automatically a 10. Pack-fresh cards can have corner dings from the packaging process, centering issues from the cutting die, and surface imperfections from printing. The rate of true gem mint 10s from a sealed pack varies by set and printer, but generally falls somewhere between 10 and 40 percent. Going in with the expectation that every pack-fresh card is a 10 leads to costly disillusionment.

Deciding Which Grading Service to Submit To
Your choice of PSA, BGS, or CGC should depend on the card and your goals. PSA 10s carry the highest market premium for most Pokémon cards, particularly vintage ones. A PSA 10 Base Set Blastoise sells for significantly more than a BGS 9.5, even though a BGS 9.5 arguably represents a higher-quality card. This is a market perception issue, not a quality issue, and it matters when you are deciding where to send your best cards.
However, BGS Black Label 10s — where all four subgrades are perfect 10s — command prices that rival or exceed PSA 10 prices for high-end cards, though they are extremely difficult to achieve. CGC has gained ground in recent years and tends to have faster turnaround times at lower service tiers. For modern cards in the $20 to $100 raw value range, CGC can be a practical choice because the grading fees and wait times are more proportional to the card’s value. Sending a $30 raw card to PSA at their current standard tier pricing does not make financial sense unless you are confident it will grade at a 10 and the graded value justifies the fee and wait.
Building a Pre-Grading Routine That Saves Money Long-Term
The collectors who consistently profit from grading are the ones who develop a disciplined sorting system. Grade every card at home first, sort them into tiers — “confident 10,” “likely 9,” “borderline,” and “not worth submitting” — and only send the top tiers. Over time, track your predictions against the grades that come back. If you are consistently overestimating by a point, recalibrate your standards.
If you are underestimating, you might be leaving money on the table by not submitting enough cards. The grading market is also evolving. PSA, BGS, and CGC have all adjusted their pricing, turnaround times, and grading standards in response to the surge in submissions over the past several years. Pre-grading at home insulates you from these shifts because you are always making submission decisions based on the card’s actual condition, not on hype or FOMO. As new sets continue to release and the hobby grows, the ability to accurately self-assess card condition is one of the most valuable skills a collector can develop.
Conclusion
Pre-grading Pokémon cards at home is a straightforward process that requires patience, a few inexpensive tools, and a systematic approach to inspecting centering, corners, edges, and surfaces. By evaluating each of these categories under magnification and good lighting, you can reliably estimate whether a card will come back as a 9 or 10 versus a 7 or 8, and make informed decisions about which cards are worth the grading fee. The goal is not to replicate a grading company’s work perfectly but to filter out cards that have no realistic chance of achieving a grade that adds value.
Start with your most valuable raw cards, practice the inspection process, and compare your assessments against actual grades when your first submissions come back. Use those results to sharpen your eye. Over time, you will develop an intuitive sense for card quality that saves hundreds of dollars in wasted grading fees and helps you focus your budget on the submissions that actually pay off.
Frequently Asked Questions
Can I use my phone camera to check for surface scratches on Pokémon cards?
A phone camera with macro mode can reveal some surface defects, but it is not a reliable substitute for a jeweler’s loupe. Phone cameras compress detail and can miss fine scratches or print lines that a 10x loupe catches easily. Use your phone as a supplement, not a replacement.
What centering percentage disqualifies a card from getting a PSA 10?
PSA allows up to 60/40 centering on the front and 75/25 on the back for a 10. Anything worse than 60/40 front centering caps the card at a 9 or lower. BGS is stricter, generally requiring 50/50 to 55/45 on both sides for a pristine 10 subgrade.
Is it worth grading modern Pokémon cards or only vintage?
Modern cards can absolutely be worth grading, but only if the raw value is high enough to justify the fee. A card worth $10 raw is almost never worth grading. A card worth $50 or more raw that you believe will score a 10 can see a significant value increase from grading, especially for chase cards like alternate arts.
Do whitening marks on the back of a card automatically mean it cannot get a 10?
Generally, yes. Any visible whitening on edges or corners, front or back, will prevent a card from achieving a 10 at PSA, BGS, or CGC. Very faint whitening that is only visible under magnification might still allow a 9, depending on severity and the grading company.
How many cards from a sealed pack typically grade as a PSA 10?
It varies by set and print facility, but a rough estimate is 10 to 40 percent of pack-fresh cards will achieve a PSA 10. Sets printed at certain facilities have better quality control than others, and older vintage packs tend to have lower gem rate percentages due to the printing and packaging technology of the era.